Search This Blog

Showing posts with label Homemaking. Show all posts

Wednesday, April 9, 2014

Easy Easter Baskets


Easter Baskets

Items Needed:

1/2 peck or 1 peck fruit basket(s)
Ribbon
Spray Paint
Hot Glue Gun/Glue Sticks
Easter Grass


Optional:

Wood Tags (or heavy Card Stock)
Vintage Easter Pics
Mod Podge
String or Twine


Instructions:

I found some super cute fruit baskets while out making my rounds at the Hobby Lobby Store for $3.99 each, and I decided that they were just the right size for Easter baskets. I also picked up some grosgrain ribbon and some wooden tags while I was there. With a little bit of spray paint and hot glue, you too can make some SUPER cute Easter baskets!

TIP!

All of these things you can purchase online should you not be fortunate enough to have a Hobby Lobby store near you. Shipping is cheap and lightening fast in their delivery. Look for the 40% off your highest price item coupon on their website.

Un-Painted Fruit Basket


http://shop.hobbylobby.com/products/natural-1-peck-bushel-basket-667634/

I spray painted the baskets white and let them dry over night.

I used my hot glue gun to attach a strip of grosgrain ribbon around the basket. I followed the brace in the center of the basket, but you could really put the ribbon anywhere you want.

Grosgrain Ribbon


TIP!

Hobby Lobby currently has grosgrain ribbon on sale for 99 cents a roll (Score!) in more colors than you can stake a stick at.

http://shop.hobbylobby.com/search/?keyword=grosgrain%20ribbon&match=AND&F_Sort=2&perpage=96

Then I tied a cute little bow on one side of the basket for a little more color.

I bought some wooden tags {4/$1 at Hobby Lobby} and with the use of some Mod Podge - covered the wood tag with a sweet little vintage Easter pic - which I then attached to each basket with a bit of string (you could use baker's twine, yarn or anything really that is in a color that coordinates with your basket)

Vintage Easter Pics on Wood Tag


Filled the basket up with green paper Easter grass. Add treats, eggs, toys etc..

All ready for Easter!

TIP!

In place of the wood tag (above) you might want to print out the pic (or pics) of your choice - on heavy card stock (to give it a little weight) punch a hole and tie it to your basket.

I'll be posting some sweet vintage Easter pics next so stay tuned!

Saturday, April 5, 2014

Basic Crocheting - Double Crochet


How To Double Crochet

To begin to Double crochet - you will chain the O train - the same as you did with your Single crochet.

* See How to Single Crochet Here:
http://intothekingsgarden.blogspot.com/2014/03/basic-crocheting.html

About 145 stitches to make a 54" wide afghan

* Remember, you will never work in the first chain from the crochet hook when you double crochet.


Row 1 of Double Crochet


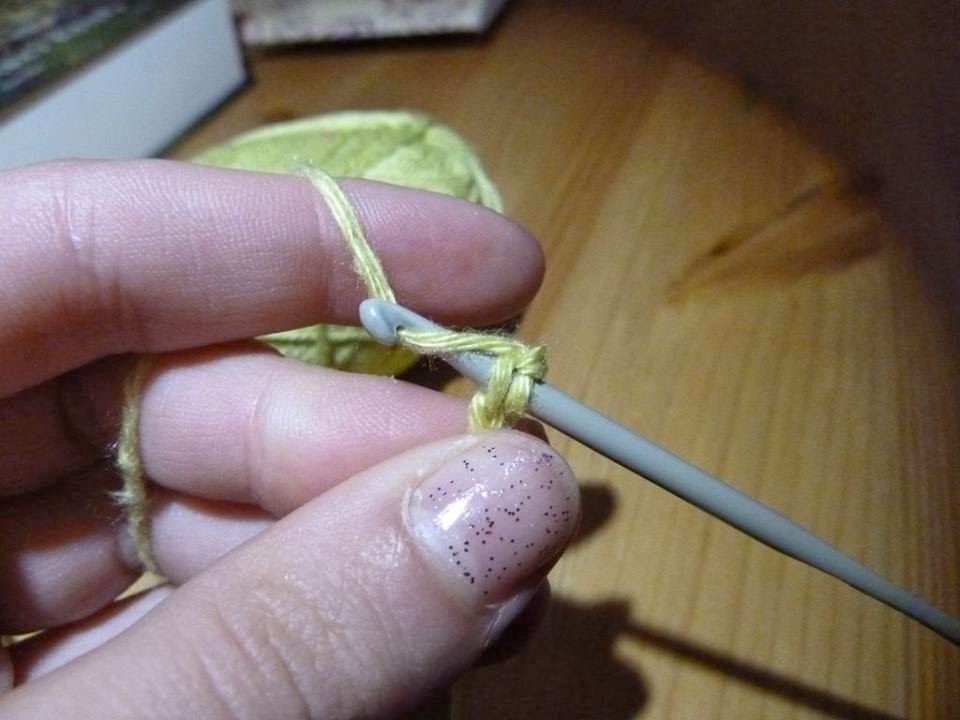
Step 1:  After you have chained the first row of 145 - Turn your work. Bring the yarn over the hook, Skip the first 3 chains from the hook and then insert the hook in the 4th chain.
 
Step 1
 
 
* Then in each of the remaining O chains you will do the following until you get to the end.


Step 2 - A:  Bring the yarn over the crochet hook and draw it through the chain stitch. You now have three loops on the hook  
 
 
Step 2 - A


Step 2 - B


Step 2B - 3:  Bring the yarn over the crochet hook and draw through the first two loops on the hook. You now have two loops left on the hook.

Step 3


Step 4:  Bring the yarn over the crochet hook and draw through both loops on the hook

Step 4


* You have now completed your first double crochet and are back to only one loop on the hook. Continue this same method until you come to the end of your train chain and are ready to begin Row 2 


1st Completed Double Crochet


Row 2 of Double Crochet

To work row 2, you need to bring the yarn to the correct height for the next row. To raise the yarn, chain 3 single crochet O's

Row 2


The three chains just made count as the first double crochet of the new row - so skip the first double crochet  you made in Row 1 and work a double crochet into the second stitch.

* Be sure to insert the crochet hook under top two loops of the stitch.

Continue until you get to the end. Turn and chain up 3 and repeat until your blanket is as long as you want it to be.


Example of Completed 2nd Row


Slow Motion Video
https://www.youtube.com/watch?v=VgA9KSJrgAc

Wednesday, March 26, 2014

Basic Crocheting - Single Crochet

Basic Chain -
The Beginning of all crochet

Completed: Pink and Off White Single Crochet Afghans


First Row - Step 1 - The Train

Pulling out a piece of the yarn ... Wrap yarn around the hook to create an O that is only as big as your needle is around - and leave a little tail piece. Tie in a firm knot.

* You'll see a lot of videos on the internet that show a crocheter making this little fancy beginning stitch- which is fine as long as you tie that stitch into a firm knot so that all of your hard work doesn't become un-raveled the first time you wash it. I often double knot mine. Just to be sure.

Step 1

Step 2


Step 2-

Wrap yarn around needle one time and pull through the beginning O stitch. Continue to wrap the yarn one time around your needle and pull through - which creates a new O (stitch) every time you do this. Counting each time you create a new O until you have 145 of them. Now you have a long train of O stitches.

* A nice size afghan is about 54 inches wide = 145 O's stitches on a train.

Step 3

Step 4

Step 5


Step 6

Step 7

 
Second Row- Step 1

After you have made 145 O stitches- Turn your train around (flip it over) and start on the 2nd row going in the opposite direction.

Step 2- The Single Crochet

In the center of each of the O stitches in your train (beginning with the first one and going one at a time until you get to the end of your train) insert your hook through the hole and wrap the yarn over the needle and pull the yarn through the hole. You will see that you now have two loops on your hook. Wrap yarn around again and this time pull the yarn through the two loops on your hook. Move on to the next O stitch and repeat until you get to the end of your train. Then turn your train (flip it over) and start all over again going in the opposite direction.

* Continue until the blanket is as long as you want it to be. I like to cover my feet when I am watching TV as well as my shoulders- so every now and again when my blanket is starting to get big I will stand up and hold it to my shoulders. If it covers my feet on the floor then I know my blanket is long enough and it's time to quit. If it is a blanket that I just want to throw over my couch or at the foot of the bed then when the blanket is as long as it is wide then it's done (in other words- a square).


Step 1

Step 2

Step 3

Step 4

Step 5


Step 3- Finishing the blanket to make it even.

Remember that little tail I had you to leave when you first started your O train (Row 1 Step 1)?

Starting there - go all the way around your blanket using the SINGLE crochet stitch until you end up back at the tail. You can go around your blanket once, twice or three times - whatever you want. This just gives the blanket stability and helps to keep it nice and even. Once you have gone all the way around the blanket (ever how many times you wanted to) you can just snip off that tail and you're done. You can make big blankets, baby blankets or even a scarf using this same train and stitch. It's all up to you! Remember; a pretty blanket is more in the colors you use than it is in the stitches you use. Variegated yarn (yarn already made with different colors built in) takes the guess work out of what colors will match well together- but I like using my imagination when mixing colors- but honestly; a solid one color afghan that matches my couch or my bed or whatever is probably my favorite.


* If you want to change color yarn then at the side of the blanket - cut your yarn off so you have a tail about 1/2 inch long. Take your new color and tie a firm knot to the tail of the old color yarn (joining the two pieces together) Crochet a couple of stitches- then go back and tie another knot in the two tails (this is just for safety and because I am a double knot kind of girl) Then close to the knot- snip the two tails of yarn off. Don't worry about the knot you made. As your afghan gets bigger- the knot will naturally slip inside the surrounding yarn and disappear.

That's it. You now know how to start an O train, how to Single crochet and how to Finish off a blanket.  Happy Crocheting!


TIP!

Here is a couple of videos to show you how it's done. At the beginning they show you how to make that fancy O stitch at the beginning- just remember to tie it in a firm knot!

https://www.youtube.com/watch?v=FGemgS1ldwg
(normal speed)


Monday, September 30, 2013

Carrot Spice Cake


CARROT SPICE CAKE

The Cake

1 1/4 Cups Vegetable Oil
2 Cups Sugar
4 Eggs
3 Carrots Grated Raw
1 cup Nuts *Optional
1 Can Crushed Pineapple 8oz
1 cup Coconut Grated (Sweetened or unsweetened are fine)
1/2 cup Raisins
2 Tsps. Vanilla Extract
2 Cups All-Purpose Flour Sifted
1 tsp. Salt
2 Tsps. Baking Soda
2 Tsps. Cinnamon


The Frosting

8 Oz. Cream Cheese
1/2 cup Butter (that’s one stick)
2 Tsps. Vanilla Extract
1 cup Nuts Chopped (Again Optional)


Directions

For the Cake:
Preheat oven to 350 degrees. Combine oil, sugar and eggs. Beat well. Stir in grated carrots, nuts, pineapple and vanilla. Add flour, salt, soda and cinnamon; beat well. Pour into two greased and floured 9 inch cake pans. Bake 35-45 minutes. Let cool before frosting.


For the Frosting:
Mix cream cheese and butter. Add sugar and vanilla. Beat until smooth. Stir in nuts.

Friday, September 27, 2013

Heeheehee!


Ohhh ... but ..... Honey ....

A man came home from work and found his children outside, still in their pajamas, playing in the mud, with empty food boxes and wrappers strewn around yard, The door of his wife's car was open, as was the front door to the house and no  sign of the dog.

Walking in the door, he found ...an even bigger mess. A lamp had been knocked over, the throw rug was against one wall, In the front room the TV was on loudly with the cartoon channel, the family room was strewn with toys and various items of clothing.

In the kitchen, dishes filled the sink, breakfast food was spilled on the counter, the fridge door was open wide, dog food was spilled on the floor, a broken glass lay under the table, and a small pile of sand was spread by the back door.

He quickly headed up the stairs, stepping over toys and more piles of clothes, looking for his wife. He was worried she might be ill, or that something serious had happened. He was met with a small trickle of water as it made its way out the bathroom door. As he peered inside he found wet towels, scummy soap and more toys strewn over the floor. Miles of toilet paper lay in a heap and toothpaste had been smeared over the mirror and walls.

As he rushed to the bedroom, he found his wife still curled up in the bed in her pajamas, reading a novel...

She looked up at him, smiled and asked how his day went.

He looked at her bewildered and asked, 'What happened here today?'

She again smiled and answered, 'You know every day when you come home from work and you ask me what in the world do I do all day?...

''Yes," was his incredulous reply..

She answered, 'Well, today I didn't do it.'


Wednesday, June 12, 2013

The Perfect Candy Apple


Red Cinnamon Candy Apples

Making candy apples isn't as difficult as one might imagine. The secret is in the use of a candy thermometer. If the candy doesn't reach the perfect temp then the result is candy that is either too soft or too hard to eat. Stirring the mixture brings the temp of the candy down slightly- so use your thermometer often to maintain the correct degree for perfect candy.

Ingredients:

8 apples (I like Granny Smith for their crispness)
8 wooden skewers (popcycle sticks work great)
2 cups granulated sugar
1 cup light corn syrup
1/2 cup hot water
1/2 cup red cinnamon candies, like Red Hots
Candy Thermometer


Preparation:

1. Prepare a baking sheet by lining it with aluminum foil and spraying the foil with nonstick cooking spray or smear on butter.
* Parchment paper works equally well. In which case simply smear on a thin layer of butter

2. Wash and dry the apples carefully. Remove the stems, and stick the skewers firmly in the stem ends.

3. Combine the water, corn syrup and sugar in a medium saucepan over medium-high heat. Stir until the sugar dissolves, then continue to cook, without stirring, until mixture reaches 250 degrees with candy thermometer. Wash down the sides of the pan with a wet pastry brush occasionally to prevent crystallization.

4. Once the candy reaches 300, add the cinnamon candies and stir briefly to incorporate. Continue to cook, washing down the sides, until it reaches 285 degrees.

5. Remove from the heat and stir the candy so that it is smooth and even. Hold an apple by the skewer and dip it in the candy, tilting the pan at an angle and rotating the apple to cover it completely with a smooth, even layer. Bring it out of the candy and twirl it to remove excess, then set it on the prepared baking sheet. Repeat with remaining apples.

6. Allow apples to cool at room temperature. Candy apples are best enjoyed within 24 hours but can last for quite some time if wrapped in plastic wrap and refrigerated.

Monday, May 13, 2013

Bath Soak - Tea Type Bags


Tea Bag Bath Soaks

Ingredients:

Empty Tea type bags (or muslin linen bags)- found at any craft or health food store
Epsom Salt
Dried Lavender
Lavender Oil
Oatmeal (NOT the quick cook kind)
Dry Powder Milk (I like to use dry powder goat's milk for this)


Directions:

To make your tea, you will also need a large mixing bowl.

First, measure out two cups of Epsom salt and add it into the bowl.

Next, add 4 tablespoons of lavender.

Then, add 25 drops of pure lavender oil into the bowl.

After that, add one cup of oatmeal. You can leave the oatmeal whole, or give it a few spins in the food processor. I chose to keep mine whole.

Last, add  1  1/2 cups of dry milk.

Stir your ingredients up until they are well combined.

Gather your tea bags, and fill 3/4 of the way full.

Sew the open tops of your tea bags closed. You can either do this by hand or by machine. I choose to do mine by hand to keep with the handcrafted feel. When you stitch to the end, string an identification tag onto the remaining thread and tie into place. I also left a loop of thread at the end so that the tea bag could be hung from a faucet head.


* To give as a gift of your tub tea, an oblong or rectangle box works best. I found a paper recipe holder at my local craft shop for $2 and it worked perfectly! I was able to fit in 8 tea bags.


Tie up your display box with a pretty piece of ribbon, or you can do as I did and use the same embroidery floss that I used to close the bag.


* I included the directions for using the tub tea on the back of a tag. (see below) 


"Drop two tea bags into a hot bath. Let steep. Ease yourself into your tub and relax. For a stronger scent, use three bags".


The best thing about making tub tea is it’s customizable! You can make any mix that you would like. Or even better, mix two scents and create something new! Simply change up the dried flower buds and the oil- everything else remains the same. For example: use dried rose buds and rose oil.


Tip!


As an alternative to using tea type bags- try using small muslin/linen type bags that have a cotton draw string. Simply add the above ingredient and tie closed. After use; empty contents and discard, rinse bags that were used and allow to dry completely. You can then refill each bag- and use again and again - using this same method.

Wednesday, October 31, 2012

Spiced Pine Cones


Spiced Pine Cone Potpourri Recipe

In a plastic garbage bag:

Small Pine cones- as many as you want
1 full container of ground cinnamon
1 small bottle of apple (or) cinnamon spice oil
(or)
1 of each for a stronger fragrance-
* These can be found in the candle section of your local chain store (like Walmart) or craft store (like Michael's)


Place your pine cones in the plastic bag and pour the ground cinnamon and the oil (or oils) over the pine cones. Tie the bag closed tightly. Shake for a few seconds to distribute the oil and cinnamon over each. Set aside in a closet or some other out of the way area. Each day for one week go and give the bag a mighty shake.

After one week you scented pine cones are ready to use. Place them in a basket or bowl and your room will smell fantastic for months. When the pine cones begin to lose their scent you can reuse them- using the same technique or go out in the yard and collect a new batch of pinecones.

Since you are using all natural ingredients you don't have to worry about the muck they put in the commercial scented pine cones (shudder) who knows what they use in those. Ohh and you might want to place the bowl or basket of scented cones in an area where the dogs and cats can't get at them and use them for paw batting practice or chew toys. It won't harm them but what a mess you will be cleaning up when they have had their fun. We are trying to create a cleaner environment; not trying to create more work for ourselves!

* If you love the smell of pine you can simply use the pine oil over the pine cones instead of apple or cinnamon oil. Replace the use of a container of ground cinnamon with a container of ground cloves. Everything else applies the same.

Wednesday, October 3, 2012

Basic Home Remedies


Basic Home Remedies:
Using Baking Soda for HEALTH: 

1. Natural Deodorant- Sprinkle or pat on pure baking soda on your armpits for a natural deodorant. This is most useful for those summer months when one tends to chaff.

2. Stinky Shoe Remedy- Sprinkle generous amount into sneakers or other shoes to help absorb odors.

3. Remove Splinters- Make a paste of baking soda and water and apply to the bottom of a bandage, and apply that overnight. In the morning, the splinter should be much easier to remove.

4. Antacid Use- about a 1/4 teaspoon in a small cup of water and drink to help reduce acid.

5. Mosquito Bites- Heres something I tried out this summer that worked really well. We had been outside alot and I had gotten a lot of misquito bites on my legs that were itching reallly badly. Mix a thick paste of baking soda and water and apply to the bites (helps if you haven't scratched them yet. In about 1 minute the itching stops and in about one hour the redness and swelling have gone away!! It was wonderful, and I used this remedy the rest of the summer with great results.

6. Cold Sore Remedy- Make a thick paste of baking soda and water and apply to cold sores at least two times a day.

7. Treats Burns- On your list of baking soda tips, put that it is good for burns.
 

For example:

I had a neighbour come over with a bad deep frying grease burn to her whole hand. I told her to put her hand over the sink. I had made up a liquid paste of baking soda and water, fairly thick and poured it over the hand. I said this will hurt just for the initial time I put it on, then will be ok. I then wrapped it in gauze to protect it and to keep the soda from going all over. She simply just needed to regauzed it daily.
The beauty of it is that there was no blistering and no scar later.


Friday, August 31, 2012

Pretty Rubber Gove Tutorial


Step 1.
Cut two fabric pieces that are four inches by 20 inches.  Narrow hem one of the long edges as shown.


Step 2.
Measure two inches from edge and mark with a pencil (see the dot jus above the 18). Now measure one inch from that point and mark again (ring finger is pointed at this dot).  Again mark two inches from your last mark and then an inch from that point.  Repeat this all the way across.  (2 inches then dot- 1 inch then dot- 2 inches then dot- 1 inch then dot- Continue in this pattern until you come to the end)


Step 3.
To make pleats take the first mark you made and place it on top of next mark which should be one inch from your first mark.  Repeat this all the way across pinning each pleat as you make it.


* This is what it will look like when you have pinned all of your pleats


Step 4.
Stitch across top of pleats as shown.


Step 5.
Pin edges together as shown on each of the short ends and sew across.  Turn to outside and press. I like to add in a little spray starch before pressing- but then I starch everything!


* This is what your end pieces will look like after your quick stitch across.


Step 6.
Pin some wide ribbon to top of your fabric as shown below.  Sew acoss the ribbon (both at the top of your ribbon piece and at the bottom to secure tightly).


Step 7.
Pin the ribbon side to the bottom of the cuff of your rubber glove. I like to turn under (about an inch or so) the rubber glove as I am pinning- just to give the rubber a little more stability. But this is completely opinional. 


Step 8.
Stitch into place.


Tada! All finished and suitable for gift giving. You don't want to be the only one that looks smashing in a pair of rubber gloves. Right?


Ohhh! I almost completely forgot! Remember those pair of red gloves I was talking about earlier with the ghastly yellow cuff?


Not any more ... and it was just so ~sew~ easy!


Thursday, August 30, 2012

Ghastly Hands and Pretty Gloves


Ohh How I Love You
My Pretty, Pretty, Rubber Gloves

Can I be honest with you? Yes of course I knew that I could. You are just so sweet that way and I love you for it.

I have the single most ghastly hands on the planet. True! They are always dry and cracked in spite of all of the lotions, potions, creams and ointments that I apply diligently before bed (and sometimes throughout the day if I can keep my mind focused). Not to mention that I almost always am in desperate need of a manicure.

My hands stay in everything. Things that would forever prevent me from becoming a ~hand model~ if I should ever aspire to such things as that- which of course I never would because I actually like using my hands.

During the course of a normal week I am scouring the tub with "Ajax" or "Mean Green" (or something equally hand harsh) for those hard to remove soap scum stains that men seem to insist on leaving behind after every shower. Not to forget the black ring around the bathtub left behind after giving the dogs a bath.


My husband ~Marvin~ was once quick to remind me that it would be one less chore I would have to do if I would simply give the dogs a bath outside instead of in the tub. I answered that clearly uneducated remark with your basic ~how can you even suggest such a thing~ glare. The next time I caught him sitting out on the patio; smoking a cigarette and thinking thoughts that only other men understand - thoughts of turtle wax, armor all, rain X, and so forth- I gave him a good spray with the garden hose and ask him "how'd that bath work for ya"? He never mentioned giving the dogs a bath outside again. Neither has he offered to give the dogs a bath for me ... but that's another story for another time.

Anywho; there are ovens to be cleaned, toilets to be cleaned, floors and baseboards, walls and windows, dishes completely out the wazoo and that's ever before I get to my crafting. Whereas then we have paints, glues, turpentine, glitters, more paint, more glue, more turpentine and the occasional nick from the needle when I am hand sewing. All which ultimately end up with my having a pair of hands that look like I work as a welder in a steel mill rather than being a happy homemaker.

My daughter Misty; who has lovely hands, ~glare inserted here~ is always buying me something precious to help restore some balance of moisture back into my hands but the problem is that I can't ever really quite commit to the process. For example: I received the most precious hand kit made by Burt's Bees from her. Have you heard of them? Simply fantastic company with the most divine products made from well ... organic bees wax and honey and so forth. Lovely! In my kit were things for the cuticles, wax's and a buffer for the nails, banana scented thick, luxurious overnight cream for the hands and a dainty pair of tight'ish fitting white cotton gloves with the cutest little bumble bees printed in the fabric. I must admit that it was a joy to use and the following day (after having slept in my bee gloves) my hands did look remarkably healthier.

I made a vow to continue to use it each night but eventually found myself pulling the gloves off in my sleep and then in the morning I had to spend a half hour trying to locate where I had tossed them during the night. Eventually our wheaten terrier "Mr. Doogles" ate one of the gloves (no doubt because it had the scent of banana- a fruit that he particularly enjoys eating) So; my ~vow~ to use the Burt's Bees nightly pretty much went out the window. If it's any consolation I do upon occasion slather up my hands and cover them with a pair of my husbands cotton socks while I am watching a late night movie. We'll let him ponder the mysteries of why his white cotton socks sometimes smell like bananas. It'll do him good to broaden his mental horizons ...


Naturally 90% of this could be avoided if I would simply don a pair of rubber gloves while cleaning but honestly... they are just so ugly. Listen; I don't have a vain bone in my body but really! who wants to be caught wearing a pair of those ghastly yellow gloves? They came out with a red pair years ago but ruined them by topping off the cuff in the same shade of horrid yellow. ~blah~

Next we come to the crucible of this note. Which is a simple tutorial on how to decorate a pair of rubber gloves that you won't be embarressed to be seen in and you'll be more apt to wear often simply because you'll look so dang cute in them. The tutorial with photos! will follow this post so stay tuned. You are just going to love them! And of course, as always, they will be ~sew~ easy.

Tata!

“Let your beauty be found in “the hidden person of the heart,
with the incorruptible beauty of a gentle and quiet spirit,
which is very precious in the sight of God.”
1 Peter 3:4

Tuesday, August 28, 2012

Simple Recipes


Asian Pepper Steak- Crock Pot

3 pounds beef sirloin
3 tablespoons flour, for dusting meat
3 cloves garlic, grated or finely chopped
1 large onion, sliced
3 red bell peppers, sliced
3 yellow bell peppers, sliced
1 can tomato sauce (8-ounces)
4 tablespoons brown sugar
3/4 cup soy sauce
Ground black pepper, to taste
2 cups rice


Preparation

In a large skillet, sear the meat in some EVOO (extra virgin olive oil) until nice and brown on both sides. Remove the steak to a cutting board and slice the steak into 1-inch thick strips.

Place the sliced steak into the crock-pot bowl, then dust the meat with flour and mix the meat around until there is no more visible flour.

Add the remaining ingredients to the crock-pot, then place a lid on top and cook on high for 4 hours or low for 6 hours.

Serve on top of cooked rice.

Monday, August 20, 2012

Housekeeping Tips


TIPS! Every Woman Should Know

Your Basic un-Housekeeping

1. Vacuuming too often weakens the carpet fibers. Say this with a serious face, and shudder delicately whenever anyone mentions Carpet Fresh.

2. Dust bunnies cannot evolve into dust rhinos when left undisturbed. Rename the area under the couch or bed "The Galapagos Islands" and claim it as an ecological exemption.

3. Layers of dirty film on windows and screens provide a helpful filter against harmful and aging rays from the sun. Call it an SPF factor of 5 and leave it alone.

4. Cobwebs artfully draped over lampshades reduce the glare from the bulb, thereby creating a romantic atmosphere. If your husband points out that the light fixtures need dusting, simply look affronted and exclaim, "What? And spoil the mood?"

5. In a pinch, you can always claim that the haphazard tower of unread magazines and newspapers next to your chair provides the valuable Feng Shui aspect, thereby reducing your vulnerability to bad moods. Roll your eyes when you say this.

6. Explain the mound of pet hair brushed up against the doorways by claiming you are collecting it there to use for stuffing handsewn play animals for the under-privileged.

7. If unexpected company is coming, pile everything unsightly into one room and close the door. As you show your guests through your tidy home, rattle the door knob vigorously, fake a growl and say, "I'd love you to see our den, but Fluffy hates to be disturbed."

8. If dusting is REALLY out of control, simply place a showy urn on the coffee table and insist that  "THIS is where Grandma wanted us to scatter her ashes..."

9. Don't bother repainting. Simply scribble lightly over a dirty wall with an assortment of crayons, and try to muster a glint of tears as you say, "Johnny did this when he was two. I haven't had the heart to
clean it..."


10. Mix one-quarter cup pine-scented household cleaner with four cups of water in a spray bottle. Mist the air lightly. Leave dampened rags in conspicuous locations. Develop an exhausted look, throw yourself onto the couch, and sigh, "I clean and I clean and I still don't get anywhere..."


Top Ten Uses For Fruitcake  

1. Use slices to balance that wobbly kitchen table.
 

2. Use instead of sand bags during a pending flood or El Nino.
 

3. Send to U.S. Air Force, let troops drop them.
 

4. Use as railroad ties.
 

5. Use as speed bumps to foil the neighborhood drag racers.
 

6. Collect ten and use them as bowling pins.
 

7. Use instead of cement shoes for those folks that have plucked your last nerve.
 

8. Save for next summer's garage sale- to wedge the wood post sign into.
 

9. Use slices in next skeet-shooting competition.
 

10. Two words: pin cushion.