In this I will share the basic philosophy of being a Proverbs 31 and Titus 2 woman that dedicates herself to the principles of Love, Support and Encouragement. That desires to bring honor to their spouse, family, community and glory to their Creator.
Search This Blog
Tuesday, July 3, 2012
Simple Crafts With Baby Food Jars
Baby Food Jar Crafts
Wondering what to do with baby food jars that keep stacking up in your recycling? Here are creative baby food jar crafts as well as some unexpected uses for baby food jars.
Floral Party Favors Or Bath Treats
Anyone with a baby or a grandbaby knows how quickly those glass baby food jars can fill up the recycling bin. This DIY is a pretty, fast and inexpensive way to decorate – simply by dipping the baby food jars into paint.
Step 1: Pour out some paint into a bowl – you don’t need much, maybe 1/2 cup or so.
Step 2: While holding the bowl on an angle, dip the jar in, and begin slowly turning the jar as it touches the paint.
Step 3: Sit the jars right-side up to dry. I let mine dry overnight. It’s important to let them dry right-side up first so that no paint drips in the wrong direction.
Step 4: Turn the jars over for a few more hours to let the bottom dry.
Bath Treats
Simply spray paint the lids; fill with your favorite bath treat (salts, scrubs, teas or bombs) and give as party favors.
Garden Chandelier
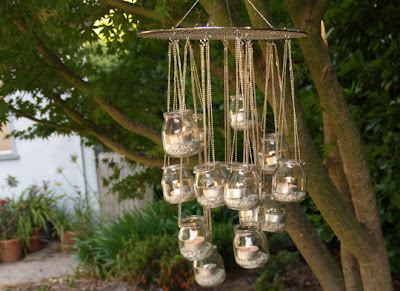
Outdoor entertaining is one of the highlights of summer, so make your evening gatherings even brighter by adding the soft, eco-friendly candlelight of a garden chandelier. This beautiful piece of home made decor is a wonderful way to reuse baby food jars. This is also a great way to reuse a circular cooling rack if you have an extra one.
Materials
Baby Food Jars
Round (or square) cooling rack
S Hooks
Roll of thin wire
Decorative Beaded chain (or ribbon or anything really that you might want to use to suspend your jars)
sand (or pebbles)
Tea light candles
Instructions
Turning over your cooling rack - you will want to tie 4 pieces of wire (1 piece from each corner) and then gather in the middle and twist together at the top to form a small hanging loop. Attach a S hood and crimp closed.
Just at the underside of the lip (I used a piece of wire about 16 inches so that I could wrap around the top of the jar several times for a really nice tight fit) you will want to wrap your wire. Bend the wire in what would be about half and pull around the jar top tightly; cross the wires and bend in the opposite direction around the jar. Next insert whatever you want to use to hang your jars - one end on each side (here I used decorative beads)and continue on bending your wire so that your beads (or ribbon) is trapped securely under the wire. When you come to the end of your wire piece simply twist in a knot and tuck the end anywhere into the wire. At the top center of your beading attach a S hook and crimp closed.
In each jar add a little sand or peddles and sit a small tea light candle.
Suspend each jar from your wire cooling rack in whatever pattern catches your fancy. Hand from a tree or your patio or whereever you would like a little ambient lighting. Very Simple to make but very Chic in it's simplicity.
Spice Storage
One of the most popular options for baby food jars is spice storage. If you are looking for a uniform, compact way to store your spices, you may want to give this a try. Popular methods for labeling the jars include chalk board paint and sticky labels (i.e. address labels). Baby food jars will fit in a variety of spice racks and other kitchen storage areas, such as drawers
Notions Storage
Buttons, Safety Pins, Bobbins, Thread, etc.
Another popular storage option for baby food jars is craft supply storage. You may want to label your jars, but unless they will be in a drawer where you can only see the tops, most likely this is not a necessity.
Desk/Office Supply Storage
Rubber bands, Paper clips, Push Pins, etc. Baby Food jars are a perfect storage suggestion to store your small desk and office supplies.
Treat Jars
Baby food jars are a nice size to fill with little candy treats for just about any occasion. You can customize your jars any way that you like. Use them as a way to serve treats at the party or have guests take home little party favor goodies.
Baby Food Jar Christmas Tree
Supplies:
20 baby food jars, cleaned and dry, with lids
1 tube clear Liquid Nails (make sure it can be used on glass)
Tinsel (may use any color- shown here with blue)
20 count Christmas lights
Hammer and metal punch
Instructions:
Using the hammer and metal punch, make holes in the lids of the jars, big enough for the lights to fit through.
Cut 2-3” pieces of tinsel and put in each jar. Screw on lids.
Glue jars together for each layer of the tree:
OOO
OO
OOOOO
OOOO
OOO
OO
O
Allow to dry for 24 hours. Then glue each row together making your tree.
Allow to dry laying down for another 24 hours.
Place lights in holes, starting at the top of the tree and working down to the trunk.


